

Having written The Witcher 3 Best Build has given time for reflection. While it is a very effective way of combat, being able to explore other pathways is still necessary when it comes to enjoying the game and what it has to offer in the long run. This Witcher 3 Tank Build is using much of what we already know to build a heavy attacker. Who is able to withstands the mightiest of foes through sheer presence and power. Embodying the spirit of the mighty bear.
Playing the game on Death March has been very rewarding. And anyone and everyone who enjoys a challenge should consider it. This build is equally as effective on lower difficulties. But shows its power on Death March, giving the player the right level of challenge, combat efficiency and tactical prowess.
High investment in the Sign branch had to be taken off the list. It took away the challenge out of the game and was limited by the mechanics, since you can only use one Sign at a time.
Furthermore, Signs are difficult to control and shift while deep in combat, doing more harm than good at times.
– Notes from the best build
Ursine Tank Hybrid Build
The foundation of the build is combat. Giving you the most advantage and survivability based on your early strengths & resources. Knowing when and how to sidestep, roll, parry and hit are the fundamental elements of the combat system and you’ll need to be getting better at it as you level. Your survivability comes from your heavy armor, the investment in Quen and later on, the Alchemy tree. However, there is a trade-off and that is your mobility in comparison to other build types.
Primary Attack & Offensive Strategy
Your primary attacks will be heavy attacks, but you will still need to make use of fast attacks. Thus an investments into both attack types is necessary. The reason behind it will become more evident as you progress. But the fast attack speed allows you to hit faster moving enemies. Who will often dodge your heavy attacks unless they have already taken hits.
Make sure to get all the Places of Power, since you need every skill point you can get your hands on for a hybrid build. And read the Easy Leveling Guide to help you with your leveling and pacing.
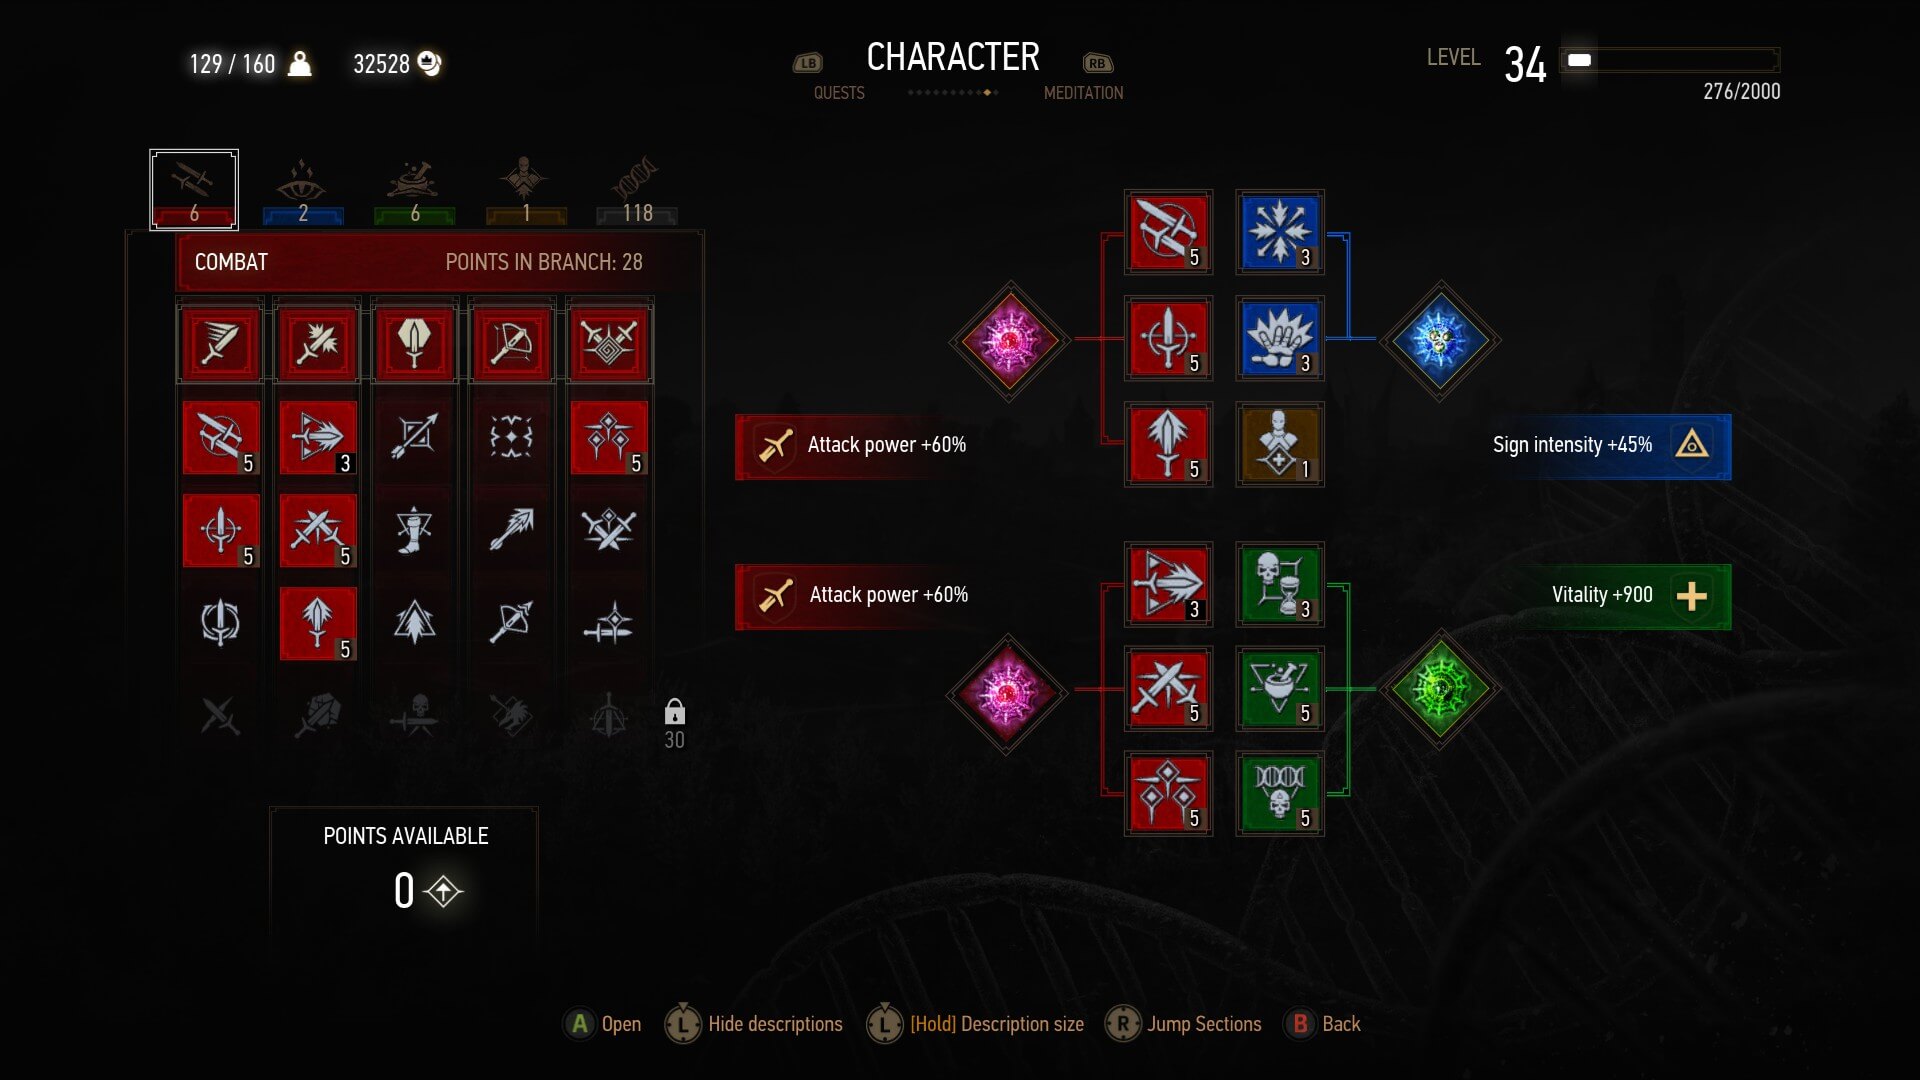
Skill Order and Distribution
If you manage to get the 6 Places of Power in White Orchard in addition to at least two levels before exiting the area. You have yourself 8 skill points. My process would be: Bear School Techniques from the general tree, followed by 3/3 Delusion & 3/3 Exploding Shield from the Sign Tree. The damage from BST, the fast cast Axii and defensive Quen Explosion is enough to give me the added advantage early in the game, assuming you’re geared.
Once that is completed all additional skill points gained will be put into the Combat Tree. Until you have maxed out all the major ones and have reached the final Tier of the Tree. Beginning with Muscle Memory, Precision Blow and utility skills such as Resolve & Razor Focus for Adrenaline point management. Especially important, if you chose to make use of Battle Frenzy. Rend will also be a must though Whirl is optional, Rend is preferable only as it allows a greater level of control. You could go for both but Whirl tends to make lazy fighters.
Once these fundamentals have unlocked and you have gained a greater level of confidence in the basics of combat. You then begin to distribute the remaining points, into Alchemy and the Sign Tree. Besides Protective Coating, Acquired Tolerance and Frenzy, Alchemy doesn’t reveal its power until Tier 3. That’s why it is the last tree of investment. Before going deep into the Alchemy Tree, it is recommended that you put a few more skill points into Sign Tree. Due to the increased passive stamina regeneration that it offers and Active Shield, which you can swap with Exploding Shield. Acting as both offense and defense.
General Skills
Bear School Techniques
(1/1) One point grants 25% increase in both heavy attacks and total vitality. Probably the best investment you’ll make all game.
Battle Frenzy
8% increase in critical hit chance for every Adrenaline Point maxing at 22%, but only useful when skills such as Razor Focus, Resolve and the Ursin Armor bonus are in effect.
Strong Back
Great early on to pickup as much items as possible and merchant them to make our most difficulty levels easier financially.
Gourmet
Food can be difficult to come by early on if you don’t know where to look. So this skill definitely helps make the most of what you do have.

Sign Skills
Exploding Shield
(3/3) Quen shield pushes opponents back when it breaks. Good tactical skill to have in combat based builds.
Delusion
(3/3) For its dialogue benefits and instant cast Axii. After Quen, this will likely be your most used skill.
Active shield
(3/3) Creates an active shield which absorbs and restores vitality based on damage. It can also be used to damage and crowd control and with a tank build it really makes sense given the 200% damage bonus of the Ursine set.
Melt Armour
Permanently weakens enemy Armor based on your Sign intensity. Maximising at 75% Sign Intensity. This can be a great utility skill to have in your toolkit. Plus Igni is your third most used Sign and often a great way to create space with larger enemies and fight your way through when crowded.
NOTE: Having three Signs skills slotted means increasing your Sign Intensity by 60% + at 8 skill points the Sign Tree offers you 5.5/s increase in Stamina Regeneration. Feel free to invest more into the Tree if you have spare points, due to the increases you gain in stamina regeneration. Which you will need for your Quen, Axii, Igni and Rend executions. However, keep in mind that after the second row of skills your return on investment will dramatically decrease.
Combat Skills
Muscle Memory
(5/5) Increase the attack damage of fast attacks by 25% +5% Adrenaline gain.
Strength Training
(5/5) The Strong attack equivalent to Muscle Memory, increase strong attack damage by 25% +5% adrenaline gain. Which in addition to Bear School Techniques gives you 50% increase in heavy attack damage.
Resolve
(5/5) At max level no adrenaline is lost when hit, 100% reduction. Good investment as you’ll need all the adrenaline you can get. Great to maximise for Battle Frenzy.
Precision Blow
(5/5) Increases the critical hit chance of fast attacks by 10% and critical hit damage by 75%.
Crushing Blow
(5/5) Increases the critical hit chance of strong attacks by 10% and critical hit damage by 75%.
Razor Focus
Instantly gain 1 Adrenaline Point when entering combat. The Adrenaline Points generated by Sword blows are increased by 25%. Adrenaline Point gain: +5% at max level. However, you might not need it all so adjust to your needs. the instant 1 point is the main benefit and used to get you to max adrenaline more quickly.
Rend
(5/5) A single target attack that ignores enemy armour and increased critical hit chance by 50%. You could always invest in both if you have spare points. Whirl, it’s alternative is too easy and takes away the challenge. Plus landing a well timed Rend strike is far more satisfying and adds to the complexity of the combat.
Deadly Precision
(2/2) At full adrenaline the player has a 6% chance of instantly killing their enemy. As OP as it’s going to get and why you need those adrenaline points.
Crippling Shot
Disables the enemies special ability for 25 seconds when a critical hit is made, using the crossbow. Requires investment in skills like Anatomical Knowledge for maximum utility. Always good to have a secondary ranged weapon at your disposal.
NOTE: Skills suchs as Deadly Precision, Razor Focus and Crippling Shot are rather luxuries and you’ll be fine without them. Feel free invest those skills into the other Trees and play around with the setup.
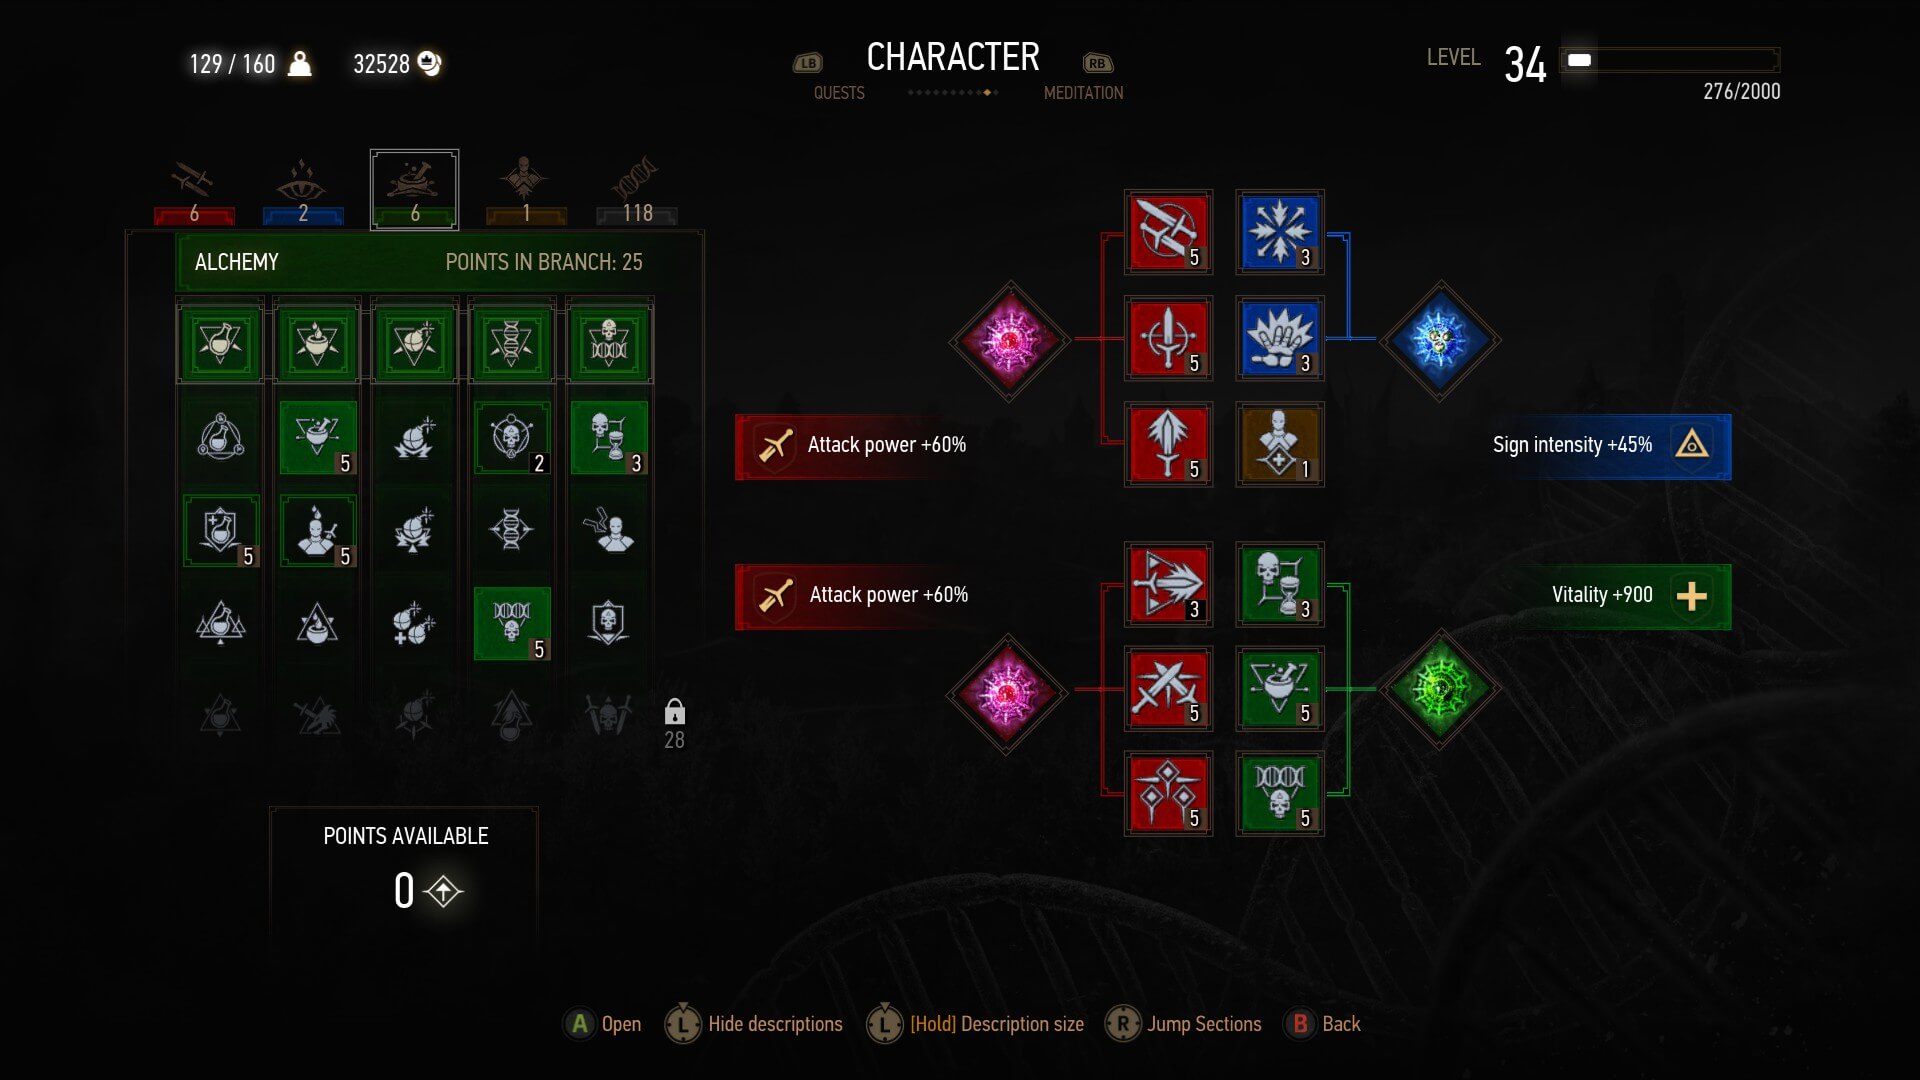
Alchemy Skills
Acquired Tolerance
(3/3) Increases maximum Toxicity by 1 for every level 1, 2 and 3 alchemy formula that the player knows. You’ll need more than 5 points to advance to the next level of the tree and this skills is great to have if you find yourself reaching the limits of your toxicity too often.
Frenzy
If potion toxicity is above 0, time automatically slows when an enemy is about to perform a counter attack. A good utility skill especially since you’ll be holding your ground more often and will find yourself needing extra help with counter-attacks. Found this to be very useful.
Protective Coating
(5/5) Adds 25% increase in protection against monster types based on your applied oils. Very useful with a tank build to further reduce damage.
Refreshment
(5/5) Makes your non-vitality potions and decoctions provide you with vitality. Again more of a skill you invest in because you have to, but can be very useful and saves you from using your Swallow.
Synergy
(5/5) Increases the mutagen placement bonus by 50%. This is the most vital skill in the alchemy tree and a no brainer, the boost in stats is unprecedented.
Hunter Instinct
(5/5) At maximum adrenaline, critical hit damage against enemies based on oil application is increased by 100%. Over powering as it gets.
Killing Spree
(5/5) If potion toxicity is above 0, each opponent killed increases the chance for a critical hit by 50%. This in combination with Hunters Instinct make you a demigod.
NOTE: You should experience a 190% increase in Potion Duration Time with 38 points invest into the Alchemy tree. Delayed Recovery is not recommended here because it takes the fun out of the game, requires too much micro-management and makes Geralt look disturbing. Plus you are already quite tanky with the Ursine gear and tank setup.
The Best Armour
The best armour for this setup is the Ursine Bear School Gear. It is the best heavy armour in the game considering its appearance, defenses bonuses and immense increase in attack power. At this point you’ll be able to take many more direct hits with the increased armor and vitality. Mastering the basics of dodge, parry and Quen application means you are one solid figure and there is less of a need to avoid getting hit and constant maneuvering.
The added benefits of the Ursine set is it increases damage dealt with Quen sign abilities. Which is why Active Shield has been recommended. Once mastered, you are a force to be reckoned with. Combine that with your ability to generate and maintain adrenaline points, you can put two and two together.
The Best Weapons
Many would say that the Bear (Ursine) weapons are the best in the game. And for this build type I strongly agree. They’re all you need to break though your enemies defenses and make quick work of bandit and deserter camps.
Early game you can have the similar level of benefits from your Viper School weapon set. Between these two weapon sets, use whatever you can get your hands on. I recommend the Griffin sets to maintain the 25% experience gain bonus.
The Best Runes, Glyphs & Runewrights
In terms of weapon runes, the best ones are immobilizers. Which include the Stribog runestone (% Chance to stagger), Triglav runestone (% Chance to stun) & Zoria runestone (% Chance to freeze). When it comes to armor glyphs, there are three that stand out. The Glyph of Igni & Quen + the Glyph of Mending. Though it seems somewhat of a personally preference.
Runewrights are another consideration. The only one that applied to this build was the Severance weapon enchantment. Though there are a few other interesting ones: such as Invigoration, Rejuvenation & Deflection. Severance is more important given your lack of mobility with a heavy tank build and makes it easier to close the gap in combat. But none of them are necessary.
The Best Potions, Decoctions & Bombs
Don’t need to make it more complicated than it really is. You’ve got two potions that you use for heals and a handful of utility potions and decoctions to help in combat and exploration, in addition to your oils that should be the highest level possible.
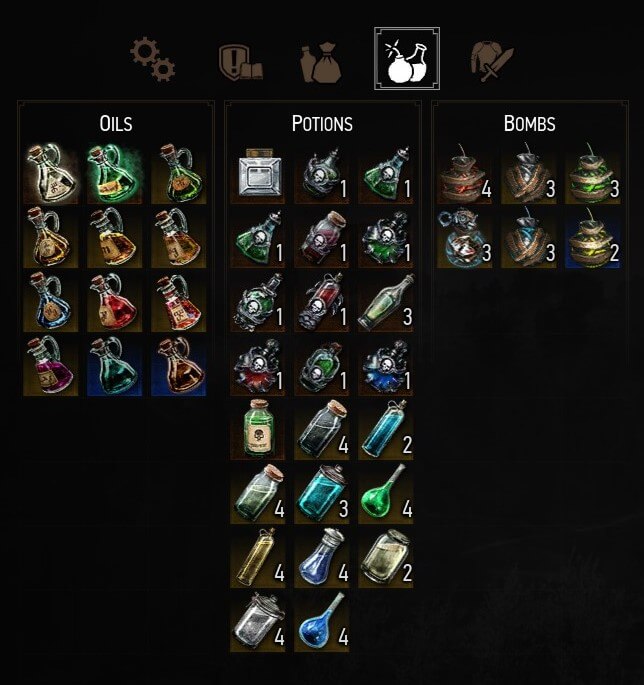
Potions:
Killer Whale: Doubles breath underwater and makes it easier to see.
Drowner Pheromones: Drowners will not attack the you. Great for underwater exploration & looting.
Thunderbolt: Increases attack power.
Tawny Owl: Increases stamina regeneration.
Swallow: Your main over the time heal.
White Raffard’s Decoction: Your other instant healing potion.
Blizzard: Slows down time after Geralt kills anything. Fun potion to experience, and extremely useful when overwhelmed or cornered.
Decoctions:
Fiend: Increases weight limit, for the greedy and the lazy.
Griffin: Taking damage raises damage resistance to that type. This plus Protective Coating can be very useful against harder/high level enemies
Katakan: Increases critical hit chance.
Troll: Regenerates vitality during and outside of combat.
Bombs:
Grapeshot: Inflicts shrapnel damage to foes within its explosion radius. (350 Physical damage, +350 Silver damage & +5 Fire damage)
Dancing Star: Produces a fiery explosion that can cause nearby opponents to start burning. (4s Effect duration & +100 Fire damage)
Devils Puffball: Releases a cloud of poison when detonated. (10s Effect duration & +100 Posion damage)
Northern Wind: Freezes foes. (4s Effect duration)
Dragons Dream: Releases a cloud of gas that explodes when ignited. (15s Effect duration & +300 Fire damage)

Gameplay
General Combat Build Tactics
- Combat Cycle: Sidestep/Parry then Fast Attack/Heavy Attack (rely on freeze, paralyse and stun effects) and finish (or begin) with Heavy Attacks (Rend)
- Your Explosive/Active Shield will create the needed space when you get crowded or when you want to do some aoe damage
- Draw your enemies to you, then counter them one by one, or push through with sheer force using Rend and your signs
- When fighting large groups try and clump them up and do as much damage to the entire group rather than the individual
- Advanced – The Juggernaut: use explosion on Active Shield sidestep forward and start laying waste using heavy combo strikes and Rend
To Conclude
Keep in mind that being good at the game isn’t just about your build. How effective you are as a Witcher is equally distributed between how well you understand your fundamentals and how well you’re geared. In addition, to your actual build (which changes based on needs & circumstances). This Ursine tank build is a very powerful build that also enjoyable to play. While staying true to the ways of the Witcher.
Now, go have fun!
More Relevant Posts:
The Witcher 3 – Death March Survival Guide
The Witcher 3 – Easy Leveling Guide
Best PC Gaming Controller for You
The Best RPG Games On PC